Tying a fishing lure correctly can significantly influence the success of an angler's outing. As any experienced fisherman would affirm, the manner in which you tie your lure holds the power to either enhance your fishing experience or lead to missed catches. This step-by-step guide aims to walk you through the essentials of tying a fishing lure, providing structure and clarity, especially for those who are new to the sport.
Understanding why proper lure tying is vital is the first step. "Your knot is the bridge between you and the fish," explained veteran angler John Smith. A poorly tied knot may slip under pressure, twist the line leading to tangles, or even damage your lure or fishing line. Simply put, a strong knot is crucial; if it’s weak, the chance of losing a catch increases significantly.
"Your knot is the bridge between you and the fish,"


Career Journey
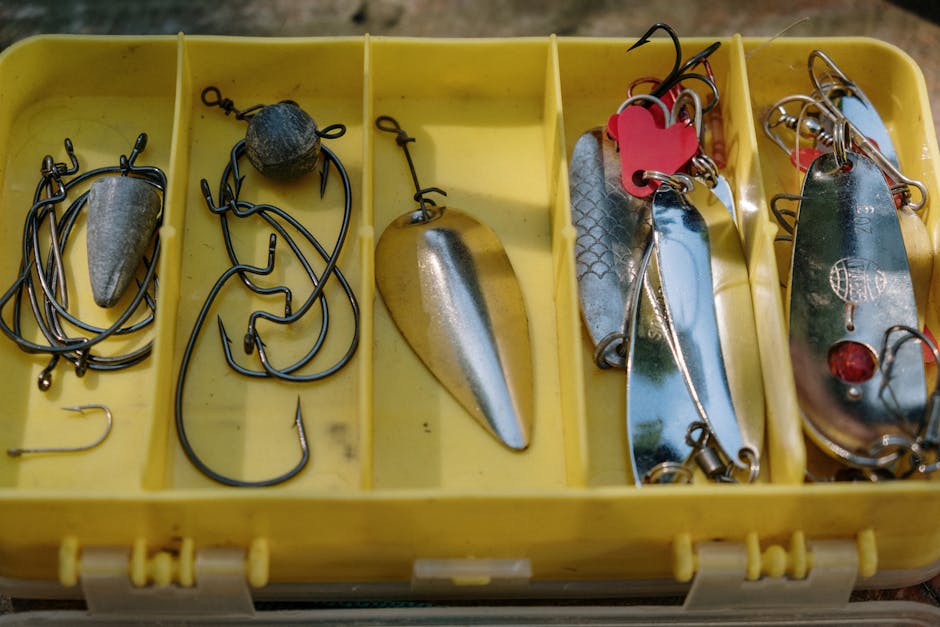
Before embarking on this luring journey, gather some essential tools. **Fishing line**—be it monofilament, fluorocarbon, or braided—is your primary connection medium. You will also need a lure of your choice, scissors to trim the tag end, and optionally, a knot-tying tool for those colder days when your fingers may struggle. Choosing the right knot is equally important, and here are the top three knots every angler should master:

The **Improved Clinch Knot** stands as an ideal beginning knot. "With basic lures and hooks, the Improved Clinch makes a solid choice," said fishing expert Linda Jones. To tie it, thread the line through the eye of your lure, wrap the tag end around the main line 5–7 times, and then thread the tag end back through the loop near the lure before bringing it back through the larger loop. Remember to wet the knot before pulling it tight to avoid friction.
"With basic lures and hooks, the Improved Clinch makes a solid choice,"
Next up is the **Palomar Knot**, which is recommended for its strength and simplicity. "This knot ties in seconds and works great with heavier lures," remarked angler Mike Thompson. To make this knot, double about 6 inches of line, then pass the loop through the lure’s eye. Tie a loose overhand knot with the doubled line, pass the lure through the loop, moisten, and tighten.
"This knot ties in seconds and works great with heavier lures,"
For anglers looking to mimic lifelike motion in the water, the **Loop Knot** is a go-to. "This knot gives your lure the freedom it needs to move naturally," stated pro angler Sara Lee. Start by tying an overhand knot about 10 inches from the end, thread the tag end through the eye of the lure, back through the overhand knot, wrap around the standing line, then thread back through the overhand knot.
"This knot gives your lure the freedom it needs to move naturally,"
To attach a lure to a leader or snap swivel, the same knots apply; however, it’s prudent to check the strength rating of your chosen swivel, ensuring it can withstand the anticipated pressure. Always perform a firm tug to test the connection before casting.
Looking Ahead
Looking Ahead
Looking Ahead
While mastering knots, acknowledging and avoiding common pitfalls is essential. Not moistening the knot can lead to friction damage, while a too-short tag end can compromise the strength of your knot. Matches should be made between the line type and the knots, and it is crucial to test the knot after tying. As Linda Jones pointed out, "Leaving a quarter-inch tag end and trimming post-tightening can prevent future worries."
To enhance your tying skills, practice makes perfect. "Practice with thicker string at home before you hit the water," advised fishing instructor Rick Adams. Using bright line aids visibility during practice, and when fishing in low light, a headlamp can be invaluable.
"Practice with thicker string at home before you hit the water,"
Questions often arise regarding fishing techniques. One common question is, "Do I need a different knot for saltwater fishing?" The answer is not strictly yes, but as pro angler Tom Black mentioned, "Ensure your knot is robust and use corrosion-resistant components, especially for saltwater environments. The Palomar and Loop knots are excellent choices here."
" The answer is not strictly yes, but as pro angler Tom Black mentioned, "
Ultimately, tying a fishing lure correctly is an essential skill for any angler. The right knots not only improve your catch rate but enhance your overall experience on the water. As the fishing community knows well, the right preparation is foundational to success, and now you are equipped with the knowledge to tie your lures like a pro. Re-tying should also be frequent, ideally every one to two hours or after reeling in a substantial catch, as the wear and tear from friction and fish teeth can swiftly degrade your line.
Master these tying techniques, and you’ll find yourself not just fishing, but consistently reeling in successes.